A sharp blade ensures you an effortless and effective cut. If you are using a hand plane for smoothing out the rough grains or trying to get rid of the lumps from the wooden board, having a sharp blade will surely make your work painless and fun.
The sharpening process is relatively easier than you could imagine. You will get it done in about a minute or a half to three minutes. If you take the mentioned approach to sharpen your plane, it’s gonna save a lot of time. Also, it’s really quick plus painless, and you will get razor-sharp results. So let’s go to the bench, roll your sleeves, and I’ll guide you on how to sharpen a hand plane.
Instructions on How to Sharpen Hand Planer Blades
Talking about the Angles
Most people can have two types of planes. You might have a low angle or a standard angled plane. The low angles are at a 12-degree bed angle; that’s where the plane iron sits, and the standard hand planes have a 45-degree bed angle, and why is this important to know? Because you want to sharpen these at different angles, a low angle gets sharpened at about 25 degrees, and a standard one will get a 30-degree micro bevel.
One of the great things about sharpening hand planes is you don’t need to do the back. You just need to do the very edge of the back, and I’ll describe to you how to do that.
Let’s talk about standard angel blades for example, so it sits at a 45-degree angle, but your bevel is down. So you’re still cutting at a 45-degree angle because what actually interacts with the wood here is at the same 45-degree angle.
So, when you sharpen that to 30 degrees with a micro bevel, It doesn’t really matter the angle as much because you’re always going to be cutting at a 45-degree angle. Typically, in my opinion, 30-degree is the sharpest angle you can get for a hand plane that has the most durable edge.
But when you get to a low-angle block plane, which plane blade is sitting at 12 degrees, but while it sits at 12-degree, the bevel is up. So while you’re at 12-degree and your bevel is up, you’re actually going to add those two together. So 12 plus 25 is going to equal 37.
So if you were to put a 30-degree micro bevel on this, suddenly you are cutting at 42-degree, which is almost the same as 45 here. So it defeats the purpose of having a low angle block plane. When you’re getting into sharpening hand plane blades, make sure you know, whether you’re working with a bevel up and low-angle plane or a standard angle bevel & down plane.
The only time that would be different, and most people don’t have them, is a standard angle bevel up block plane. That’s going to be at a 20-degree bed angle plus your 25-degree blade, and you get 45 degrees again, so that would be the only time that you sharpen a bevel-up plane to put a 30-degree micro bevel on it.
If you wanted to do a little bit of a higher angle for some crazy figure or something like that, but typically your low angle stuff is going to be better for end grain and straighter grained woods.
Things You Will Need for Hand Plane Blade Sharpening
Let’s talk about what you need for sharpening. When it comes to sharpening a hand plane blade, you have some options. I would suggest a Diamond Stones. I would also like to offer cheaper alternatives, the Waterstones.
When you sharpen the hand planes, try to lean more towards the water stones because they cut a bit faster and get the job done quickly. You’re going to need an angle guide, or you can do it freehand. I would recommend you use a marker to see if you are making any progress and a square and a thin piece of metal like an old saw blade or a ruler. And, that’s for when you do the back. You will need a strop as well. So if you have those, you can get the job done very quickly.
The Sharpening Begins.
When you’re sharpening a hand plane blade, it is gonna be easy as pie, and the reason it’s so easy to do is you are just sharpening the tip of it. You would rarely sharpen the back bevel, which is 25 degrees from the factory, unless it gets a significant chip or defect that needs to be regrounded out.
Usually, you would just quickly sharpen the tip, and you’re going to put a slight camber on it. So basically, what this means is a very exaggerated version of it. It’s going to be like one or two degrees. Still, it keeps your corners from digging into the wood when you’re making overlapping passes because you want almost all the handle and blade to be cutting except for the very corners.
And if you are sharpening the freehand way, you would rock it back and forth until you find your bevel and then lock your wrist and tilt it up just a little bit and then you would make your passes like that.
If you’re using a jig to set the blade at the required angle, find a jig that has markings like that to show you where 30 degrees is or you can use a setup block to set the degrees for sharpening. But using a jig is very handy. It just gives you the exact angle and you can lock it in and then take the little jig off but as you set it at 30 degrees, you can see a little bit of light under the plane blade right where the back of it’s not touching.
So, you know, you’re doing just the tip of the blade. That’s something you want to verify if you do use a jig that you’re just doing the tip and when you look at a micro bevel you just want a tiny bit of that heel up of the stone because getting the tip is essential. Still, you don’t want to overdo it because you get some funky angles in your hand plane.
So I’m going to recommend using Waterstones. Obviously, if you have access to Diamond Stones, try using it. These are great, especially when you’re trying to keep a super square edge.
To get that slight camber, you will just sharpen the tips and you can adjust in the hand plane the angle at which your blade is sitting. So, if you get a little bit off square, you can fix it later when you’re setting up your hand plane.
Hand Plane Sharpening with A Stone

The first thing when you’re using Water Stones, you want to make sure they’re flat. For an efficient sharpening, you will need to use a 600 grit, a 1000 grit, a 3000 grit, and an 8000 gritstone.
Now, start the sharpening using the 600 grit-stone but before that, flatten them properly. Take a pencil and just draw a grid over the stone; you don’t need straight lines. Make sure it’s nice and wet and then take a flattening stone or take diamond plates and simply rub it over the top until that pencil line. There you go. Now, you know that’s a flat surface.
Waterstones will cut steel faster, but they do wear quickly. So if you’re sharpening in the same place, you’re going to create a hollow in your stone. The lower the grit number like 600, it gets that Halo a lot. When you get up into really fine grit that hollow could happen pretty quickly. So if you’re doing a lot of sharpening, you want to check that regularly and make sure you are flat.
So after 600 grit-stone, try to sharpen your blade at the 1000 grit-stone. And the way you are going to do this and the camber is, you are going to keep even pressure on both sides and do 30 Strokes. Then just check the surface and make sure you are getting an even cut the way through, and this is why you use the marker.
You can use your marker just to put a little bit of Ink on the front, and that’ll help you see where you’re cutting; just do 30 strokes and check the markers all done. You are getting a nice micro bevel. Okay. Now when you are done with 30 strokes, start to press down with just pressure on your right finger and do 5 backward strokes, then do 5 backward strokes more on the left side or other side.
Now it’s time to move on to the next Stone, which is 3000 grit. Follow the same thing, 30 strokes and then five on each side. Then go to 8000 grit stone and follow a similar approach. Just make sure you have a lot of water near you, as you would need.
Just check to make sure you have a perfect sharpness and precise angle; try using a square; if you see a little teeny bit of light peeking through each corner, then do 30 strokes on the highest gap one.
If you can see a slurry on the stone, that’s a good thing. That’s the metal cutting the stone sort of breaking apart. Take a paper towel and wipe that slurry off. You can see that, an excellent polish there and try to feel on the back for a burr. There’s just a little piece that you can feel back there with your fingernail. Now. It’s time to take out the jig because sharpening the front bevel is done.
Stropping the Blade
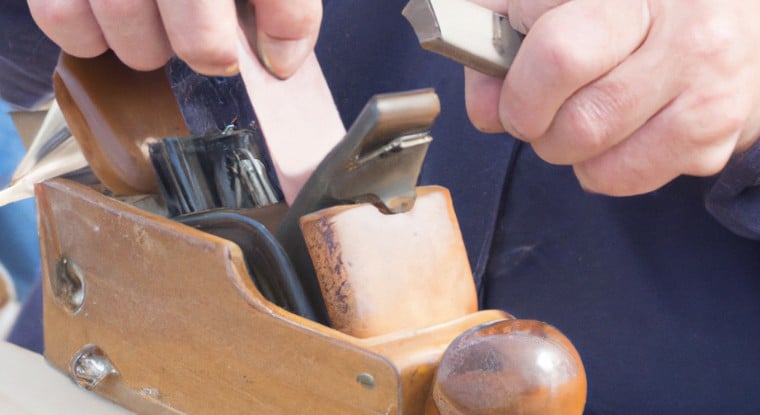
It’s stropping time now. When you strop, the trick is that you really need to put a lot of pressure. It would probably be impossible to bend new steel blades. Please don’t put everything you have into it, but you want to put enough pressure that you’re getting into your strop.
Try adding a metal polishing compound. Do the strop once every five times you sharpen, and the reason is that when this cakes up or gets too smooth, you lose kind of the grit of the strop, and it loses its effectiveness. So what you need to do is to put your hand in it and feel the texture. Just rock your blade until you feel the bevel and if it just comes up a little bit, try to do 30 strokes.
Read Also: Find out which shoulder planes are the bestsellers now!
How to Get a Hand Plane Blade Scary Sharp
Final Words
After reading the article, I hope you have an in-depth idea of how to sharpen a hand plane. It’s super easy because you can adjust the hand plane with the lateral adjustment. If you’re a couple of degrees off square, make sure you’re getting the micro-bevel, you just need that slight polish right on end, and that’s all you need. After all, using a sharp blade makes using a hand plane so much more enjoyable.
You May Also Like:


